
Serverless Upload to Object Storage
So there you are, building the world's next breakthrough social platform. And of course you want to minimize cost, administration, etc. so you use IBM Cloud Functions (Apache OpenWhisk). Then you decide to let users manage their profile picture. Uploading a file to a Cloud Function takes some consideration - and then there is the problem that the environment will destroy itself, and the uploaded content, after execution. In this post, we combine IBM Cloud Object Storage with Web Actions for robust, persistent storage.
HTTP Multipart Request
Most web developers will think of this as submitting an HTML form - often for the purposes of uploading files. When we look at the content going across the wire, you will first see a typical HTTP header, with one notable addition. There will be an entry in the header for the "boundary" of the various pieces of content. Then as you look trough the rest of the request, you will see that boundary marker between each distinct item being sent - a form field, and a file, for example.
From an example shown on Stack Overflow:
POST /cgi-bin/qtest HTTP/1.1
Host: aram
User-Agent: Mozilla/5.0 Gecko/2009042316 Firefox/3.0.10
Accept: text/html,application/xhtml+xml,application/xml;q=0.9,*/*;q=0.8
Accept-Language: en-us,en;q=0.5
Accept-Encoding: gzip,deflate
Accept-Charset: ISO-8859-1,utf-8;q=0.7,*;q=0.7
Keep-Alive: 300
Connection: keep-alive
Referer: http://aram/~martind/banner.htm
Content-Type: multipart/form-data; boundary=----------287032381131322
Content-Length: 514

------------287032381131322
Content-Disposition: form-data; name="datafile1"; filename="r.gif"
Content-Type: image/gif

GIF87a.............,...........D..;
------------287032381131322
Content-Disposition: form-data; name="datafile2"; filename="g.gif"
Content-Type: image/gif

GIF87a.............,...........D..;
------------287032381131322
Content-Disposition: form-data; name="datafile3"; filename="b.gif"
Content-Type: image/gif

GIF87a.............,...........D..;
------------287032381131322--
When this content arrives at the traditional middleware, such as Express on Node.js, the boundary label is found, and the request is parsed to get the parts. Parts are then placed in variables relative to how the middleware functions. In the context of a Cloud Function however, there is no Express to parse the request, so we need to (a) get access to the raw HTTP content and (b) parse it ourselves.
Upload to Cloud Function
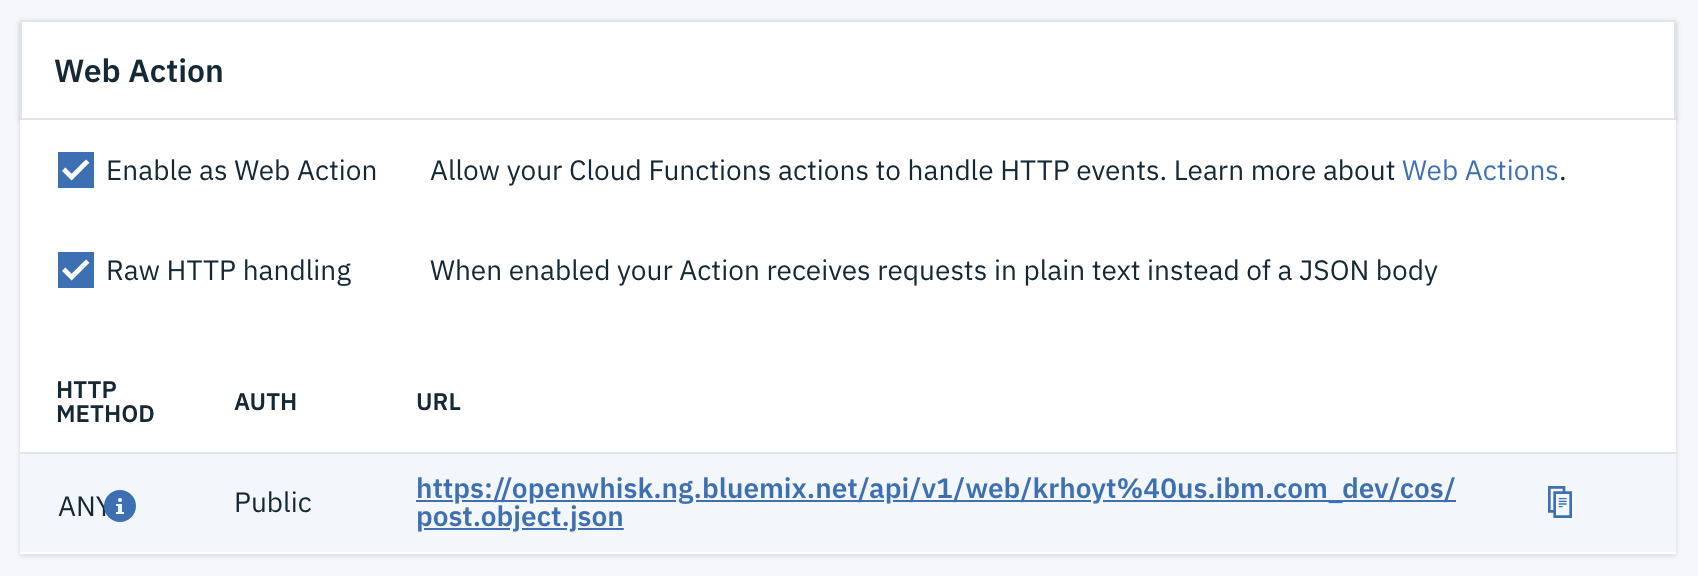
If you are familiar with the CLI for Cloud Functions, you may already be familiar with the --web argument, which allows you to expose the function to HTTP endpoints. There is a raw addition that can be made to this argument to enable raw handing of the HTTP content. With this change the function will receive the raw HTTP string, not an object that has already been parsed. And this is exactly what we want.
ibmcloud fn action create cos/post.object --kind nodejs:8 action.zip --web rawNote that this setting can be found in the IBM Cloud Functions web-based UI as well. Select an action and then Endpoints. In fact, I prefer the web UI for tweaking actions once they have been created.
Parsing the HTTP Content
When I originally started down this path, I was determined to parse the HTTP content myself. After all, the boundary is called out right there in the header. How hard could it be to find the boundary in the body and parse it myself? It turns out that there are a lot of edge cases that make this harder than it sounds. In the end, I turned to the "parted" library for help, with a special assist from "string-to-stream".
const multipart = require( 'parted' ).multipart;
const sts = require( 'string-to-stream' );

let decoded = new Buffer( params.__ow_body, 'base64' );
let stream = sts( decoded );

const options = {
  limit: 30 * 1024,
  diskLimit: 30 * 1024 * 1024
};

let parser = new multipart(
  params.__ow_headers[ 'content-type' ],
  options
);
let parts = {};

parser.on( 'error', function( err ) {
  console.log( 'parser error', err );
} );

parser.on( 'part', function( field, part ) {
  parts[field] = part;
} );

parser.on( 'end', function() {
  console.log( 'File upload complete.' );
} );

stream.pipe( parser );
The first step here is to decode the HTTP request body, and create a stream from it. Then we set aside a splash of disk space. Up next is the actual parsing of the body. Various events occur during the parsing, most notably, when the parsing process has ended. When the parsing ends you will have a parts variable with properties reflecting the various names of the fields that were provided when the request was made.
That is to say that if you have <input type="file" name="picture"> then you will have a parts.picture property containing the file contents. You can then choose to write it to disk, send it on to another service for further processing, etc.
Of course as a user profile picture, or other file type you may want to keep around for some duration, writing the contents to disk is not going to do you any good. That content will be destroyed along with the Cloud Function once the processing has finished. We really need to put the file somewhere reliable - such as IBM Cloud Object Storage.
Upload to Object Storage
Under the covers, IBM Cloud Object Storage (COS) is OpenStack Swift, and conforms to the interface established by AWS S3. You create buckets, and put objects in the buckets. There are SDKs available in various languages, but we are going to continue along the Node.js path. There is a specific fork of the S3 library for COS which I recommend using for the most consistent results.
Instantiate COS
The first step in using the library is to instantiate it as a client. A quick look at the documentation for the library shows that we need endpoint, apiKeyId, and serviceInstanceId values. For me, finding the right pieces in the UI took some effort the first time.
let cos = new AWS.S3( {
  endpoint: '<endpoint>',
  apiKeyId: '<api-key>',
  ibmAuthEndpoint: 'https://iam.ng.bluemix.net/oidc/token',
  serviceInstanceId: '<resource-instance-id>',
} );
Endpoint
When you are looking at the list of buckets, you will see a Location column. The bucket I am using for this example sits in us-east. Click on Endpoint in the left sidebar. When I created the bucket, I selected Regional resiliency, so I will select Regional. Then select the corresponding location such as us-east. We will be using Public access, which in the case of us-east yields s3.us-east.cloud-object-storage.appdomain.cloud.
API Key
Next we will head to the Service credentials section by clicking on that link in the left sidebar. You may have a number of credentials, each will have the option to View credentials. Expanding this section yields a section of JSON. Look for the field labeled apikey.
Service Instance ID
The resource-instance-id is found in this block of JSON-formatted credentials as well.
Put an Object
Putting an object into COS looks exactly like it would if you were using the AWS S3 SDK. On the COS client you call putObject() with the content you want to store, the bucket in which you want to store it, and the name of the content itself.
let obj = fs.readFileSync( parts.file );

await cos.putObject( {
  Body: obj,
  Bucket: 'file-upload',
  Key: parts.name
} )
.promise()
.then( ( data ) => {
  console.log( 'File storage complete.' );
} );
When we uploaded the file from the browser (or other client) to the Cloud Function, we ended up with a parts object holding the file contents in a file property (which came from the name of the HTML input). To get this ready for storage, we read it into a Buffer object and provide that as the Body parameter.
The Bucket name should match the desired bucket from your COS instance. You can name the file whatever you need to for your application. Key is equivalent to name in the COS/S3 model. For the purposes of flexibility, I like to send the name along with the file - effectively, I like to make the name a parameter on the service.
The
putObject()call is usingasync/await. If we do not wait for the upload to finish, the function will terminate before the file ever gets uploaded.
All Together Now
Now that we know how to upload, and parse, a file to a Cloud Function, and how to then put the file onto Cloud Object Storage, all that is left is to string the bits together.
function upload( params ) {
  const AWS = require( 'ibm-cos-sdk' );
  const fs = require( 'fs' );
  const multipart = require( 'parted' ).multipart;
  const sts = require( 'string-to-stream' );

  return new Promise( ( resolve, reject ) => {
    let decoded = new Buffer( params.__ow_body, 'base64' );
    let stream = sts( decoded );

    let parser = new multipart(
      params.__ow_headers[ 'content-type' ], {
        limit: 30 * 1024,
        diskLimit: 30 * 1024 * 1024
      }
    );
    let parts = {};

    parser.on( 'error', function( err ) {
      console.log( 'Whoops!', err );
    } );

    parser.on( 'part', function( field, part ) {
      parts[field] = part;
    } );

    parser.on( 'end', async function() {
      let cos = new AWS.S3( {
        endpoint: params.COS_ENDPOINT,
        apiKeyId: params.COS_API_KEY,
        ibmAuthEndpoint: params.COS_AUTH_ENDPOINT,
        serviceInstanceId: params.COS_SERVICE_INSTANCE
      } );

      let obj = fs.readFileSync( parts.file );

      await cos.putObject( {
        Body: obj,
        Bucket: params.COS_BUCKET,
        Key: parts.name
      } )
      .promise()
      .then( ( data ) => {
        resolve( {
          headers: {
            'Content-Type': 'application/json'
          },
          body: data
        } );
      } );
    } );

    stream.pipe( parser );
  } );
}

// Do not forget to export
exports.main = upload;
There are some particularly important details to consider when putting everything together. The first is that the main function returns a Promise. This is done to keep the function running until a result is ready. Without this promise, the function would terminate and the file would (a) never get parsed and (b) never get stored.
The other important detail comes up in the end callback of the parsing operation. The function provided is marked as async. The reason for this is that the COS operation is promise-based. And again, if we do not wait for it to finish, the function will return before the file is stored. The means we need to use the await keyword. The await keyword can only be used inside an async function.
It is probably worth noting that I put my COS credentials in parameters provided to the function. I do not however expose those parameters to the client. Those parameters are provided at the function level. You can do this on the CLI, or in the Cloud Functions UI tooling. I prefer the tooling when working with very long strings like the ones needed for COS connectivity. YMMV.
Next Steps
Now that we know how to get a file up to IBM Cloud Object Storage via IBM Cloud Functions, the next step is to get it back down. I will go over what this looks like in my next post. This will give us the read, edit, and add operations of BREAD. A little further on, and we can browse and delete. Then we can piece together a full file management system built using serverless.